Rebooting is a refreshing process for a PC but not when there’s a game running on it. When your PC reboots while playing games, it’s irritating and it’s also not good for your system as well. When your system shuts down and restarts while running a heavy process like playing games then, it takes a heavy toll on your computer’s efficiency.
What Causes Your PC to Restart Automatically While Playing Games?
Some possible reasons that can cause this problem are: Note: We request you to first check if your PC meets the game requirements. Here, we mean the recommended requirements for the game, not the minimum. You can check the game’s requirements by just googling. Also Read: 18 Best Game Boosters and Optimizers for Windows PC in 2021: Free and Paid
Easy Fixes to Solve Windows 10 Restarts While Playing PC Games
Before we dive into the fixes, make sure that you’re logged in as an administrator and also have a stable and active internet connection. Start from the top of the list and make your way through all of them, till you find the fix that solves your issue.
Fix 1: Check The Power Settings
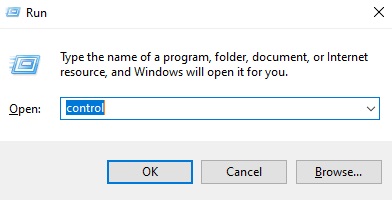
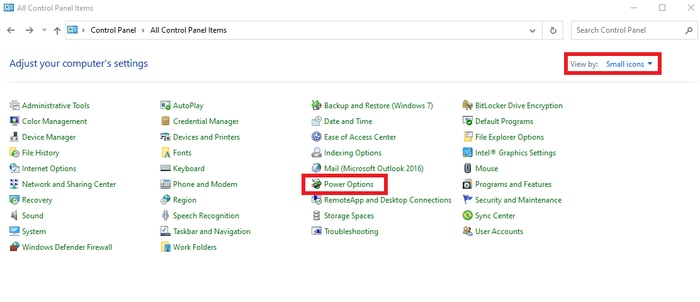
Power settings of a computer decide how much power will be redirected towards modules on your motherboard. These settings might even hold even if the requirements are above the maximum threshold. If there is no consistency between these two, you may face various issues. Now, we’ll show you how to navigate to power settings through the control panel and change it, manually. Step 1: First of all, Press Windows+R to launch the Run dialog box. In the dialog box type ‘control’ and press Enter. Doing this opens your computer’s control panel. Step 2: In the control panel, click on Power Options.
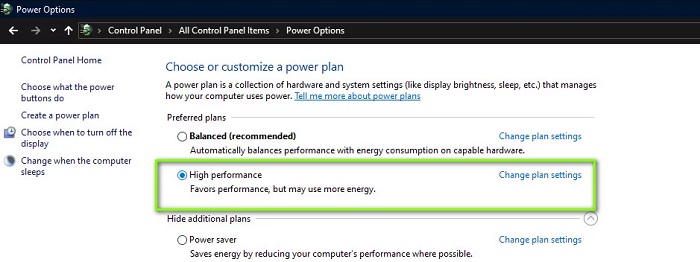
Step 3: Here, you’ll see the currently used power mode. If it is set as Power Saver, change it to High performance or Balanced. Step 4: If you’ve made some changes to each plan, internally. Then, click on Change plan settings and select Restore default settings to this plan. Save and close all the menus, Restart your computer to check if the issue is solved or not, Also Read: Why Do My Games Keep Crashing in Windows 10 {FIXED}
Fix 2: Check Your GPU
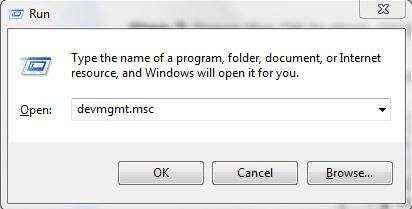
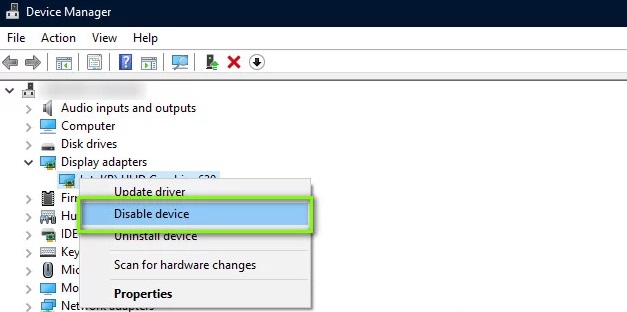
Generally, every user who’s experienced this issue have installed third-party GPUs like NVIDIA or AMD which are far more superior to those in-build GPUs. However, there are some instances where they may have compatibility issues with the system or some other issues on their own. In this fix, we will guide you through Device Manager and disabling third-party GPUs to see if this solves the issue. Step 1: Press Windows + R, type “devmgmt.msc” in the dialog box, and press Enter. Step 2: In the Device Manager, look for the Display adapters. Right-click on the graphics card and click on Disable device. Step 3: After you disable the device, reboot your PC to check if the issue is still resilient.
Fix 3: Try to Disable Overclocking
Overclocking is an important element in any gaming PC setup. In overclocking, the processor executes robust computations until its temperature goes beyond the threshold temperature. When it gets to that temperature, it returns back to normal CPU speed. Several users have been informed that they were able to stop those random and frequent restarts when they disabled overclocking. Here we’ll suggest that you stop using any kind of overclocking and use your CPU at the factory speed. Along with it, do ensure that you’ve gotten rid of all the speed-enhancing programs from your PC. These tools are infamous for messing up with the operating system and graphics when they attempt to ‘optimize’ the PC by stopping several vital processes. Also Read: 12 Best Overclocking Software For Windows In 2021
Fix 4: Updating Graphics Drivers
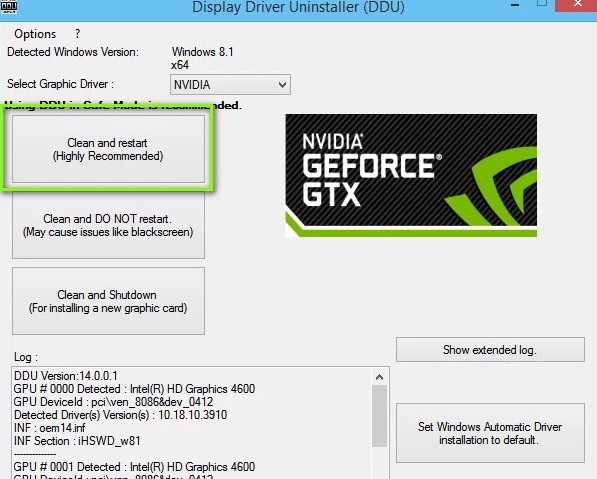
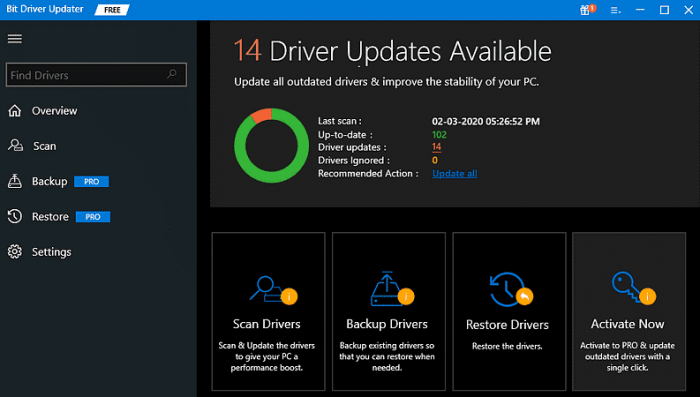
Graphics drivers are the most important factors when you run computer games. The job profile of the graphics driver includes relaying the information from the motherboard to the graphics hardware of your PC. There is also a possibility that your graphics drivers may have a problem of their own. In that case, it’s highly recommended that you update them as soon as possible. In this fix, we’ll install default device drivers and see if this solves the problem or not. Step 1: Go to the manufacturer’s official website and download the Display Driver Uninstaller file. Step 2: After installing DDU(Device Driver Uninstaller), boot your PC in Safe Mode. Step 3: When DDU launches, click on the first option i.e. ‘Clean and restart‘. This will uninstall the existing drivers from your machine. Step 4: Once the uninstallation completes, boot your machine normally. Press Windows logo + R, type ‘devmgmt.msc’ in the dialog box, and then hit Enter from your keyboard. Right-click anywhere and then choose “Search for hardware changes”. The default drivers will now be installed. Now launch the game to see if this resolves the issue. In most cases, the default drivers won’t be able to satiate your needs. So, you can install the most up-to-date drivers using either Windows Update or any third-party software like Bit Driver Updater. Bit Driver Updater is the easiest and safest way to find, download and install the most genuine drivers. The best thing about this driver updater is – it only provides authentic and WHQL tested drivers. To use Bit Driver Updater, perform the below-outlined instructions: Step 1: Firstly, download the Bit Driver Updater.
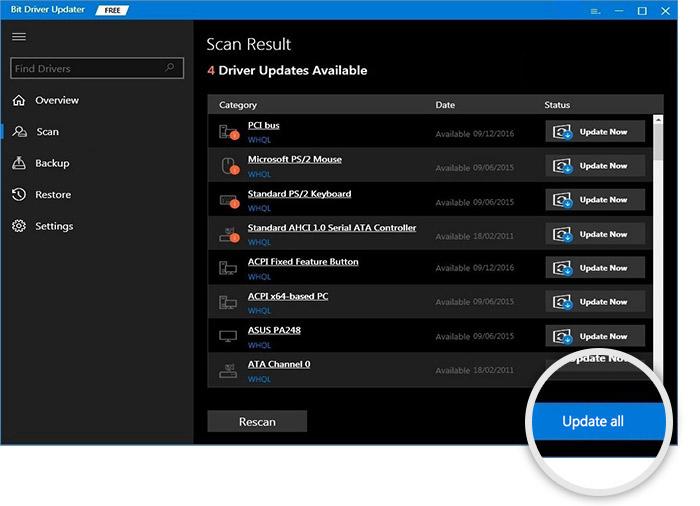
Step 2: Follow the installation wizard to get it installed completely on your PC and run it. Step 3: Find the Scan button on the left menu pane and click on it to begin the scanning. Step 4: Once the scanning is done, then check the list and navigate to problematic graphics drivers. Next, click on the Update Now button that appeared beside the drivers. Step 5: If you have a pro version, then you will be able to update all outdated drivers with a click. To do the same and save a lot of time, just click on the Update All option as shown below. That’s all! After you’ve installed the latest drivers, reboot your computer to check if the issue is resolved or not.
Fix 5: Check Your Power Supply Unit
PSU is one of the most important components of gaming as it provides the necessary power and voltage required to other individual components. For instance, SATA links might need extra power than a motherboard. So, if your PSU is not working properly, you may experience various issues ranging from crashes to restarts. You can temporarily use another PSU and test if the problem is still resilient when you use that hardware. You can also change the cables that are connected to the main electricity outlet. If the ‘random restarts’ do not stop there, that means you should get your Power Supply Unit checked. Also Read: 13 Best Free CPU Benchmark Software For Windows In 2021
Was This Guide Helpful?
So, these are some of the most useful and effective fixes on; how to solve restarting while playing games. all the above-listed fixes are tried and tested by thousands of users. There’s no need for you to try them all, just go through them until you find the one that works best for you. Did these workarounds help you? Do let us know in the comments section below. Also, for more tech-related stuff like news, driver guides, and tips subscribe to our Newsletter. Along with this, you can also follow us on Facebook, Twitter, Instagram, and Pinterest.