Setup and Use Messages App on Mac
Just like your iPhone, the Messages App on Mac also allows you to send and receive unlimited number of free iMessages from all your Contacts using Apple Devices. In addition to iMessage, the Mac Messages App can be configured to use carrier supported SMS Messaging and other popular messaging services like Outlook, Gmail and others. The main advantage of using the Messages app on Mac is that you can be faster and more accurate while sending Messages, compared to sending Messages using the limited screen and virtual keyboard of an iPhone. Also, it is really easy to search for and attach files and images to Messages sent from a Mac.
Setup iMessage Service on Mac
Follow the steps below to setup iMessage service on your Mac, in case you had missed setting up iMessage during the setup process of your Mac or want to confirm whether or not iMessage has been properly setup on your Mac.
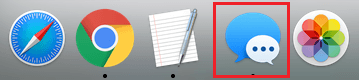
Open the Messages app on your Mac by clicking on the Messages icon in the Dock of your Mac.
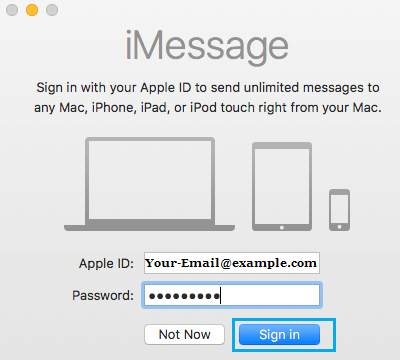
You will be prompted to sign-in using your Apple ID Email Address and Password (See image below)
Note: You may be asked to enter your verification code, in case you have enabled two-step authentication for your Apple ID 3. Next, click on the Messages tab in the top-Menu bar of your Mac and then click on Preferences option in the drop-down menu.
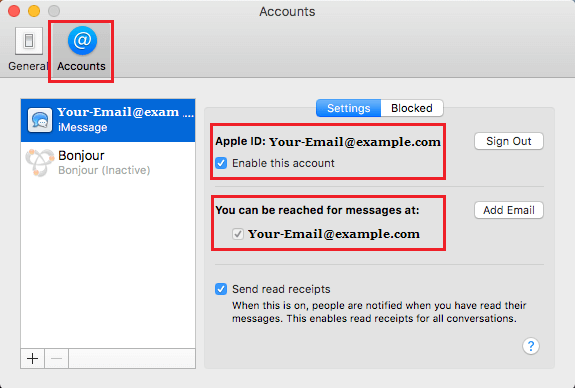
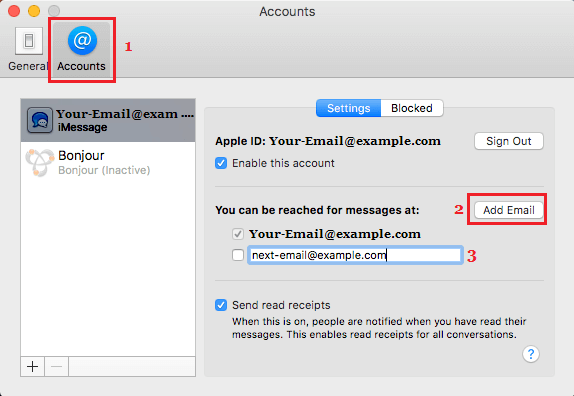
- On the Preferences screen, click on the Accounts tab and make sure that the Email Address listed under “You can be reached for Messages at” is the same as your Apple ID Email Address (See image below)
This means that you are all setup to send and receive iMessages using your Apple ID. The advantage of using Apple ID Email Address with the Messages App on your Mac is that it allows you to access Messages on any Apple device linked to the same Apple ID.
How to Send iMessages From Mac
Sending an iMessage from your Mac is as easy as sending it from an iPhone.
Open the Messages App on your Mac
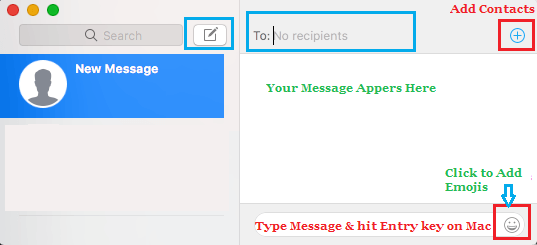
Next, click on the New Message icon to start a New iMessage on your Mac (See image below).
On the New Message window, you can either type your recipient’s Name, Email address, or phone number in the “To” field Or click on the +Plus icon and choose recipients from your Contacts List.
Next, type your Message and press the Return key on the keyboard of your Mac to send this Message.
You can include Emojis in your Message by clicking on the Emoji button (See image in step 2 above). 6. Adding Photos, Images and Files to your iMessage is also easy. You can simply Paste the image or drag it to the iMessage window.
Add Emails To Messages App on Mac
In addition to iMessage, the Messages App on your Mac supports most third party Messaging services like Outlook, Gmail, Hotmail and others. In order to use these services, you will need to add them to the Messages App on your Mac.
Open the Messages app on your Mac.
Next, click on the Messages tab in the top-Menu bar of your Mac and then click on Preferences option in the drop-down menu.
On the Preferences screen, click on the Accounts tab. Next, click on Add Email button and enter the new Email Address that you would like to associate with the Messages App on your Mac (See image below).
Similarly, you can add other Email Addresses to the Messages app on your Mac. This will enable you to check all your Email Accounts from within the Messages App on your Mac and use any Email Accounts to send Messages from Mac.
Setup SMS Messaging on Mac
In case you have an iPhone with an active Cellular plan, you can Setup the Messages App on your Mac to Send and Receive carrier supported SMS and MMS Messages from your Mac.
- Open the Messages App by clicking on the Messages icon in the Dock of your Mac.
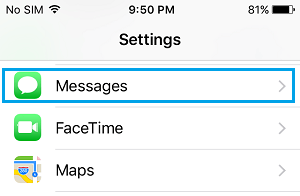
Leave the Messages App open on your Mac, so that it can receive a security code generated during the next steps. 2. Now, go to your iPhone and tap on Settings. 3. On the Settings screen, tap on Messages (See image below)
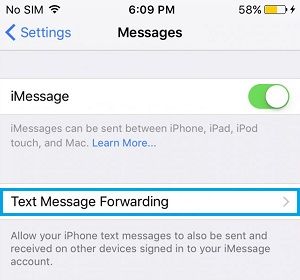
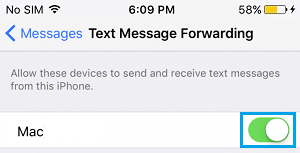
4. On the Messages screen, tap on Text Message Forwarding.
- On the next screen, enable your Mac to send and receive text messages using your iPhone (See image below).
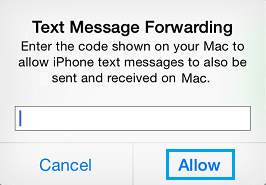
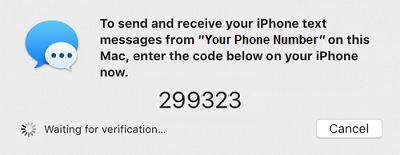
6. You will see a pop-up, prompting you to enter a six-digit verification code from your Mac (See image below).
Go to your Mac and you will see the six digit verification code waiting in the Messages App.
Enter the verification code into pop-up on iPhone and tap on Allow.
After this you will be able to send Carrier supported SMS and MMS Messages from your Mac using the Cellular Plan of your iPhone.